This is the second in a multi-part series in which we explore and compare various deep learning tools and techniques for market forecasting using Keras and TensorFlow. In Part 1, we introduced Keras and discussed some of the major obstacles to using deep learning techniques in trading systems, including a warning about attempting to extract meaningful signals from historical market data. If you haven’t read that article, it is highly recommended that you do so before proceeding, as the context it provides is important. Read Part 1 here. Part 2 provides a walk-through of setting up Keras and Tensorflow for R using either the default CPU-based configuration, or the more complex and involved (but well worth it) GPU-based configuration under the Windows environment. Stay tuned for Part 3 of this series which will be published next week.
CPU vs GPU for Deep Learning
No doubt you know that a computer’s Central Processing Unit (CPU) is its primary computation module. CPUs are designed and optimized for rapid computation on small amounts of data and as such, elementary arithmetic operations on a few numbers is blindingly fast. However, CPUs tend to struggle when asked to operate on larger amounts of data, for example performing matrix operations on large arrays. And guess what: the computational nuts and bolts of deep learning is all about such matrix operations. That’s bad news for a CPU.
The rendering of computer graphics relies on these same types of operations, and Graphical Processing Units (GPUs) were developed to optimize and accelerate them. GPUs typically consist of hundreds or even thousands of cores, enabling massive parallelization. This makes GPUs a far more suitable hardware for deep learning than the CPU. Of course, you can do deep learning on a CPU. And this is fine for small scale research projects or just getting a feel for the technique. But for doing any serious deep learning research, access to a GPU will provide an enormous boost in productivity and shorten the feedback loop considerably. Instead of waiting days for a model to train, you might only have to wait hours. Instead of waiting hours, you’ll only have to wait minutes. When selecting a GPU for deep learning, the most important characteristic is the memory bandwidth of the unit, not the number of cores as one might expect. That’s because it typically takes more time to read the data from memory than to perform the actual computations on that data! So if you want to do fast deep learning research, be sure to check the memory bandwidth of your GPU. By way of comparison, my (slightly outdated) NVIDIA GTX 970M has a memory bandwidth of around 120 GB/s. The GTX 980Ti clocks in at around 330 GB/s!Baby Steps: Configuring Keras and TensorFlow to Run on the CPU
If you don’t have access to a GPU, or if you just want to try out some deep learning in Keras before committing to a full-blown deep learning research project, then the CPU installation is the right one for you. It will only take a couple of minutes and a few lines of code, as opposed to an hour or so and a deep dive into your system for the GPU option. Here’s how to install Keras to run TensorFlow on the CPU. At the time of writing, the Keras R package could be installed from CRAN, but I preferred to install directly from GitHub. To do so, you need to first install the devtools package, and then dodevtools::install_github("rstudio/keras")
Then, load the Keras package and make use of the convenient install_keras() function to install both Keras and TensorFlow:
library(keras)
install_keras()
That’s it! You now have the CPU-based versions of Keras and TensorFlow ready to go, which is fine if you are just starting out with deep learning and want to explore it at a high level. If you don’t want the GPU-based versions just yet, then I’m afraid that’s all we have for you until the next post!
Serious Deep Learning: Configuring Keras and TensorFlow to run on a GPU
Installing versions of Keras and TensorFlow compatible with NVIDIA GPUs is a little more involved, but is certainly worth doing if you have the appropriate hardware and intend to do a decent amount of deep learning research. The speed up in model training is really significant. Here’s how to install and configure the NVIDIA GPU-compatible version of Keras and TensorFlow for R under Windows.Step 1: What hardware do you have?
First, you need to work out if you have a compatible NVIDIA GPU installed on your Windows machine. To do so, open your NVIDIA Control Panel. Typically, it’s located under C:\Program Files\NVIDIA Corporation\Control Panel Client , but on recent Windows versions you can also find it by right-clicking on the desktop and selecting ‘NVIDIA Control Panel’, like in the screenshot below: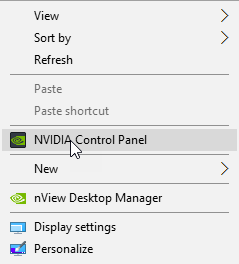
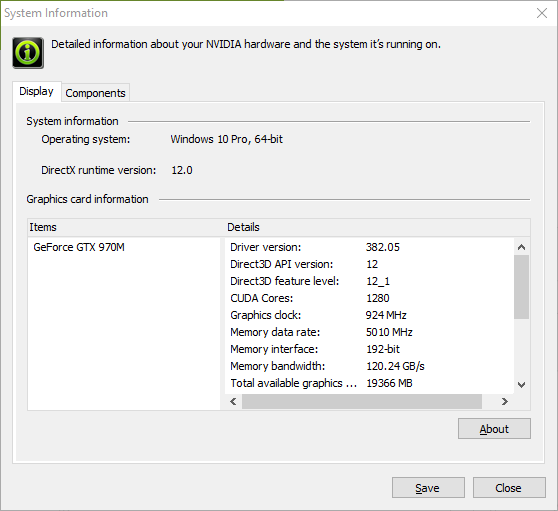
 This will bring up the details of your NVIDIA GPU. Note your GPU’s model name (here mine is a GeoForce GTX 970M, which you can see under the ‘Items’ column): While you’re at it, check how your GPU’s memory bandwidth stacks up (remember this parameter is the limiting factor of the GPU’s speed on deep learning tasks).
Step 2: Is your hardware compatible with TensorFlow?
Next, head over to NVIDIA’s GPU documentation, located at https://developer.nvidia.com/cuda-gpus. You’ll need to find your GPU model on this page and work out its Compute Capability Number. This needs to be 3.0 or higher to be compatible with TensorFlow. You can see in the screenshot below that my particular GPU model has a Compute Capability of 5.2, which means that I can use it to train deep learning models in TensorFlow. Hooray for productivity.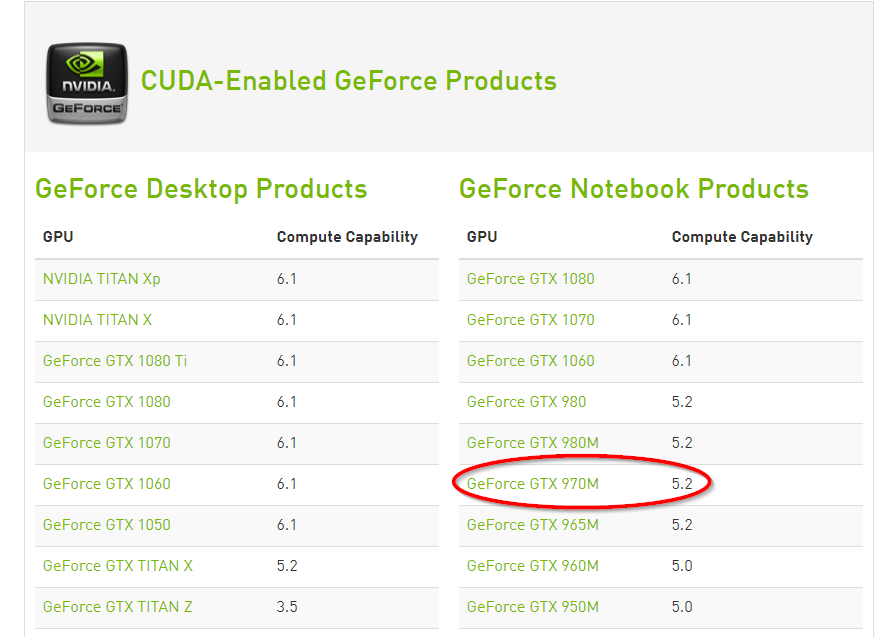 In practice, my GPU model is now a few years old and there are much better ones available today. But still, using this GPU provides far superior model training times than using a CPU.
Step 3: Get CUDA
Next, you’ll need to download and install NVIDIA’s CUDA Toolkit. CUDA is NVIDIA’s parallel computing API that enables programming on the GPU. Thus, it provides the framework for harnessing the massive parallel processing capabilities of the GPU. At the time of writing, the release version of TensorFlow (1.4) was compatible with version 8 of the CUDA Toolkit (NOT version 9, which is the current release), which you’ll need to download via the CUDA archives here.1Step 4: Get your latest driver
Step 5: Get cuDNN
Finally, you’ll need to get NVIDIA’s CUDA Deep Neural Network library (cuDNN). cuDNN is essentially a library for deep learning built using the CUDA framework and enables computational tools like TensorFlow to access GPU acceleration. You can read all about cuDNN here. In order to download it, you will need to sign up for an NVIDIA developers account. Having activated your NVIDIA developers account, you’ll need to download the correct version of cuDNN. The current release of TensorFlow (version 1.4) requires cuDNN version 6. However, the latest version of cuDNN is 7, and it’s not immediately obvious how to acquire version 6. You’ll need to head over to this page, and under the text on ‘What’s New in cuDNN 7?’ click the Download button. After agreeing to some terms and conditions, you’ll then be able to select from numerous versions of cuDNN. Make sure to get the version of cuDNN that is compatible with your version of CUDA (version 8), as there are different sub-versions of cuDNN for each version of CUDA.2 Confusing, no? I’ve circled the correct (at the time of writing) cuDNN version in the screenshot below (click for a clearer image): Once you’ve downloaded the cuDNN zipped file, extract the contents to a directory of your choice.
Step 6: Modify the Windows %PATH% variable
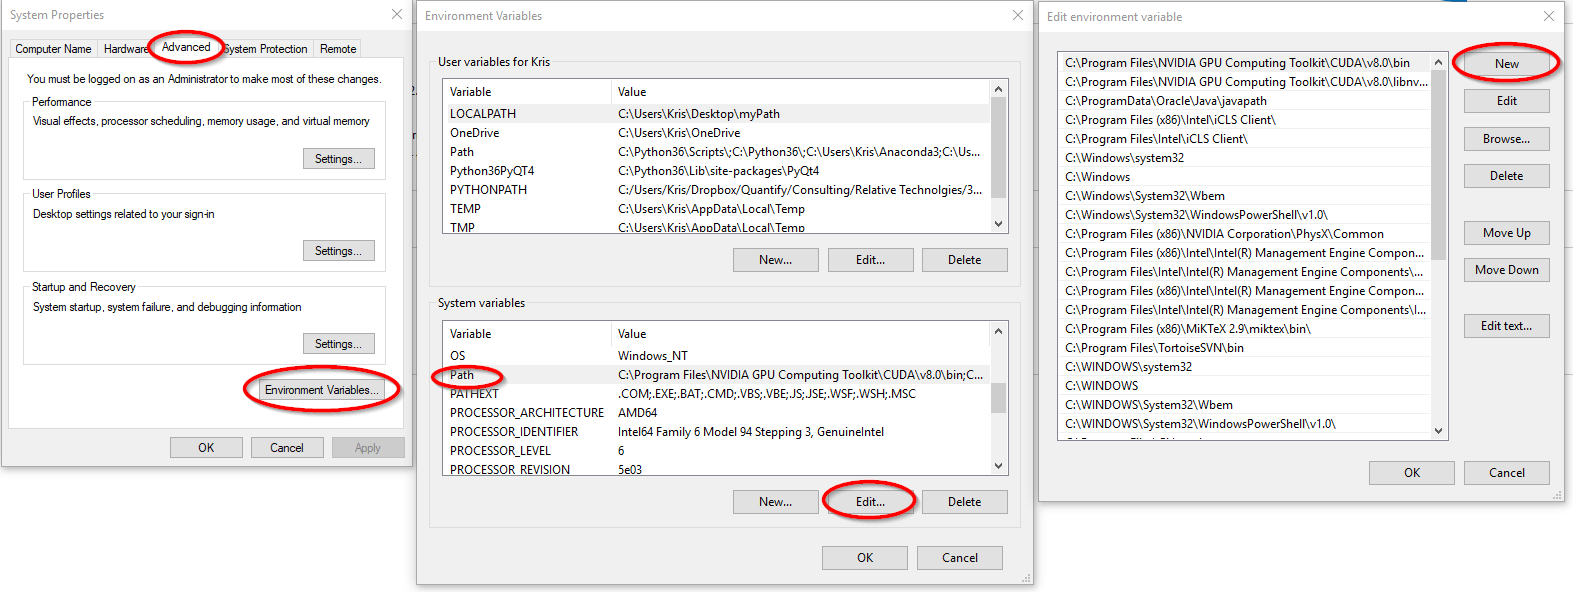
We also need to add the paths to the CUDA and cuDNN libraries to the Windows %PATH% variable so that TensorFlow can find them. To do so, open the Windows Control Panel, then click on System and Security, then System, then Advanced System Settings like in the screenshot below: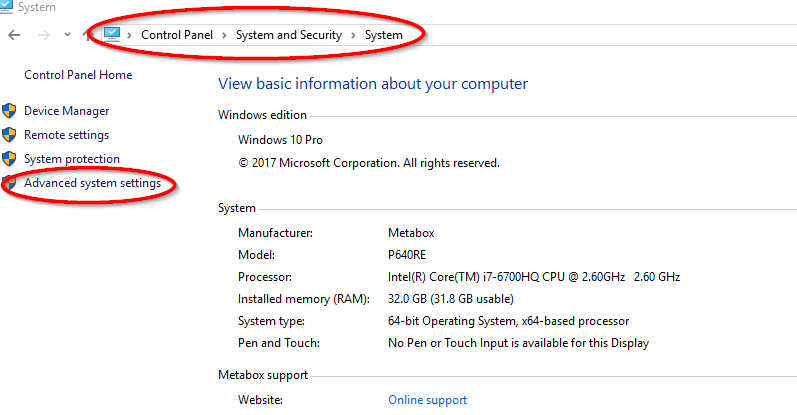 Then, when the System Properties window opens, click on Environment Variables. In the new window, under System Variables, select Path and click Edit. Then click New in the Edit Environment Variable window and add the paths to the CUDA and cuDNN libraries. On my machine, I added the following paths (but yours will depend on where they were installed):
- C:\Program Files\NVIDIA GPU Computing Toolkit\CUDA\v8.0\bin
- C:\Program Files\NVIDIA GPU Computing Toolkit\CUDA\v8.0\libnvvp
- C:\ProgramData\cuDNN_6_8\bin
Step 7: Install GPU-enabled Keras
Having followed those steps, you’re finally in a position to install Keras and configure it to run TensorFlow on the GPU. From a fresh R or R-Studio session, install the Keras package if you haven’t yet done so, then load it and run install_keras() with the argument tensorflow = ‘gpu’ :devtools::install_github("rstudio/keras")
library(keras)
install_keras(tensorflow = 'gpu')
The installation process might take quite some time, but don’t worry, you’ll get that time back and a whole lot more in faster training of your deep learning experiments.
That’s it! Congratulations! You are now ready to perform efficient deep learning research on your GPU! We’ll dive into that in the next unit.
A troubleshooting tip
When I first set this up, I found that Keras was throwing errors that it couldn’t find certain TensorFlow modules. Eventually I worked out that it was because I already had a version of TensorFlow installed in my main conda environment thanks to some Python work I’d done previously. If you have the same problem, explicitly setting the conda environment immediately after loading the Keras package should resolve it:library(keras)
use_condaenv("r-tensorflow")
Also note that the compatible versions of CUDA and cuDNN may change as new versions of TensorFlow are released. It is worth double checking the correct versions at tensorflow.org.
Where to from here?
- If this walk-through was useful for you, you might like to check out another how-to article on running trading algorithms on Google Cloud Platform
- If the technical details of neural networks are interesting for you, you might like our introductory article
- To find out why AI is taking off in finance, check out these insights from my days as an AI consultant to the finance industry
Free Case Study:
A wantaway engineer’s journey into professional trading and out again
I went from engineering to an equity partnership at a prop trading firm to running my own systematic trading operation from home in Western Australia.
This case study is the full story – every mistake, every breakthrough, and some things I trade today.


Hello!
While trying to install keras, i got this error:
————————————————————————————————————————————————
> install_keras(tensorflow = ‘gpu’)
Error in install_keras(tensorflow = “gpu”) :
You should call install_keras() only in a fresh R session that has not yet initialized Keras and TensorFlow (this is to avoid DLL in use errors during installation)
——————————————————————————————————————————————–
Thanks!