
 In this post, I’m going to show you how to set up a Google Cloud Platform compute instance to act as a server for hosting a trading algorithm. We’ll also see why such a setup can be a good option and when it might pay to consider alternatives. Cloud compute instances are just a tiny fraction of the whole GCP ecosystem, so before we go any further, let’s take a high-level overview of the various components that make up Google Cloud Platform.
What is Google Cloud Platform?
GCP consists of a suite of cloud storage, compute, analytics and development infrastructure and services. Google says that GCP runs on the very same infrastructure that Google uses for its own products, such as Google Search. This suite of services and infrastructure goes well beyond simple cloud storage and compute resources, providing some very handy and affordable machine learning, big data, and analytics tools. Google Cloud Platform consists of:- Google Compute Engine: on-demand virtual machines and an application development platform.
- Google Storage: scalable object storage; like an (almost) infinite disk drive in the cloud.
- BigTable and Cloud SQL: scalable NoSQL and SQL databases hosted in the cloud.
- Big Data Tools:
- BigQuery: big data warehouse geared up for analytics
- DataFlow: data processing management
- DataProc: managed Spark and Hadoop service
- DataLab: analytics and visualization platform, like a Jupyter notebook in the cloud.
- Data Studio: for turning data into nice visualizations and reports
- Cloud Machine Learning: train your own models in the cloud, or access Google’s pre-trained neural network models for video intelligence, image classification, speech recognition, text processing and language translation.
- Cloud Pub/Sub: send and receive messages between independent applications.
- Management and Developer Tools: monitoring, logging, alerting and performance analytics, plus command line/powershell tools, hosted git repositories, and other tools for application development.
- More which I haven’t mentioned here!
Using Google Compute Engine to Host a Trading Algorithm
Introduction
Google Compute Engine (GCE) provides virtual machines (VMs) that run on hardware located in Google’s global network of data centres (a VM is simply an emulation of a computer system that provides the functionality of a physical computer). You can essentially use a VM just like you would a normal computer, without actually owning the requisite hardware. In the example below, I used a VM instance to:- Host and run some software applications (Zorro and R) that execute the code for the trading system.
- Connect to a broker to receive market data and execute trades (in this case, using the Interactive Brokers IB Gateway software).
Pros and Cons of Running Trading Algorithms on Google Compute Engine
There’s a lot to like about using GCE for managing one’s trading infrastructure. But of course, there will always be edge cases where other solutions will be more suitable. I can only think of one (see below), but if you come up with more, I’d love to hear about them in the comments.Pros:
- GCE abstracts the need to maintain or update infrastructure, which allows the trader to focus on high-value tasks instead, like performance monitoring and further research.
- The cost of a cloud compute instance capable of running a trading algorithm is very reasonable (I’ll go into specifics below). In addition, you only pay for what you use, but can always increase the available resources if needed.
- Imaging: it is possible to create an ‘image’ of your operating system configuration and any applications/packages necessary to run your algorithm. You can start a new compute instance with that image without having to manually install applications and configure the operating system. This is a big time-saver.
- Scalability: if you find that you need more compute resources, you can add them easily, however, this will interrupt your algorithm.
- Security: Google claims to have excellent security and employ a team of over 750 experts in that field, and take measures to protect the physical security of their data centres and the cybersecurity of their servers and software.
- Uptime: Google commits to providing 99.95% uptime for GCE. If that level of uptime isn’t met in any particular month, Google issues credit against future billing cycles.
- Access to other services: since the GCP services all play nicely together, you can easily access storage, data management, and analytical tools to complement or extend a compute instance, or indeed to build a bigger workflow on GCP that incorporates data management, research and analytics.
Cons:
- If your trading algorithm is latency sensitive, GCE may not be the best solution. While you do have some choice over where your algorithm is physically hosted, this won’t be ideal if latency is a significant concern. For the vast majority of independent traders, this is unlikely to be a deal-breaker, but it is certainly worth mentioning.
Pricing
GCE is surprisingly affordable. The cost of hosting and running my algorithm is approximately 7.6 cents per hour, which works out to around $55 per month (if I leave the instance running 24/7) including a sustained use discount, which is applied automatically. Factoring the $300 of free credit I received for signing up for GCP, the first year’s operation will cost me about $360. This price could come down significantly, depending on the infrastructure I use, as I’ll explain below. I used an n1-standard-1 machine from GCE’s list of standard machine types. This machine type utilizes a single CPU and allocates 3.75 GB of memory, and I attached a 50GB persistent disk. This was enough to run my trading algorithm via the Zorro trading automation software (which requires Windows), executed through Interactive Brokers via the IB Gateway. The algorithm in question generates trading signals (for a portfolio of three futures markets) by processing hourly data with callouts to a feedforward neural network written as an R script, and it monitors tick-wise price data for micro-management of individual trades. The machine type I chose handled this job reasonably well, despite recommendations from Google’s automated monitoring that I assign some additional resources. These recommendations generally arise as a result of retraining my neural network, a task that proved to be more resource intensive than the actual trading. Thankfully, this only happens periodically and I have so far chosen to ignore Google’s recommendations without apparent negative consequence. I used a Windows Server 2016 image (since my trading application runs on Windows only) and a 50GB persistent disk, which is the minimum required to run such an image. The Windows Server image accounts for the lion’s share of the cost – approximately $29 per month. A scaled-down version running Linux (Ubuntu 17.04) with a smaller persistent disk runs at less than half this cost: 3.4 cents per hour or $24.67 per month with a sustained use discount. Clearly there are big savings to be made if you can move away from Windows-based applications for your trading infrastructure. Also worth mentioning is that you are only charged for what you use. If you need to stop your algorithm in the middle of the month, you’ll only be charged for the time that your instance was actually running. Most of the niche providers of private trading servers will charge you at best for the full month, regardless of when you stop running your algorithm.How to Run a Trading Algorithm on GCE
As you can see from the previous descriptions, Google Cloud Platform consists of a LOT of different services. Finding one’s way around for the first time can be a bit tricky. This part of the article consists of a walk-through on setting up and running a trading algorithm on GCE, aimed at the new GCP user.Step 1: Sign up for Google Cloud Platform
Go to https://cloud.google.com/ and log in to your Google account (or sign up for an account if you don’t have one). Note the $300 in free credits you receive for use within the first 12 months.Step 2: Navigate to Google Compute Engine
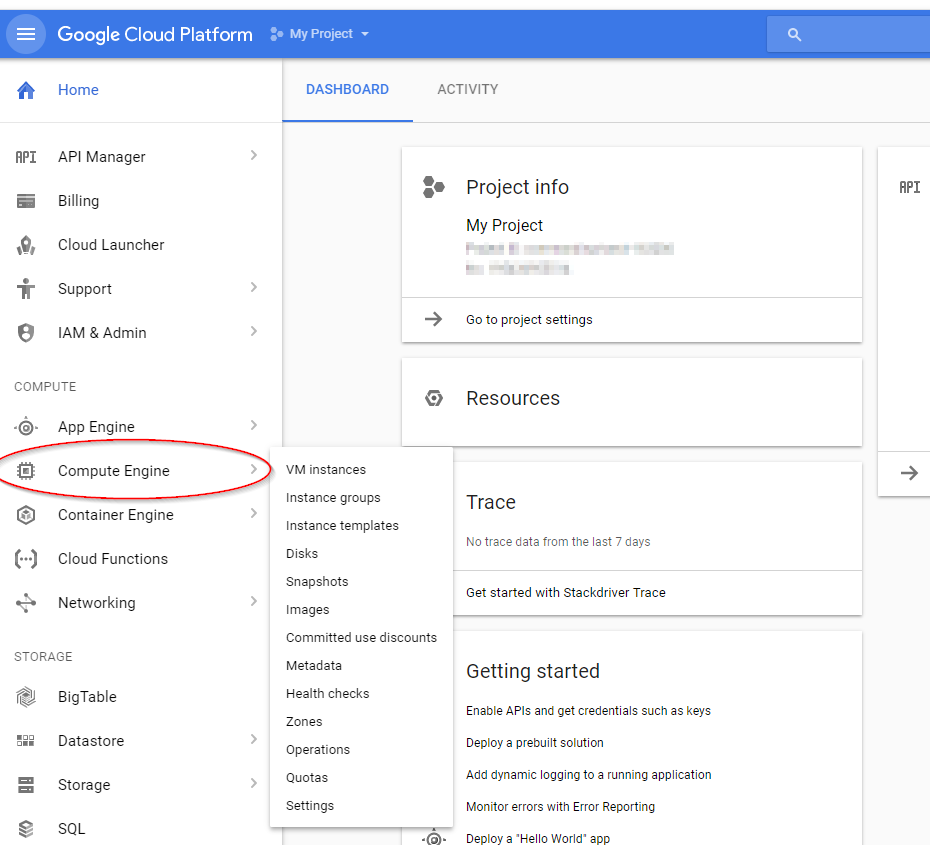
Firstly, from the GCP homepage, navigate to your GCP Console via one of the options shown below: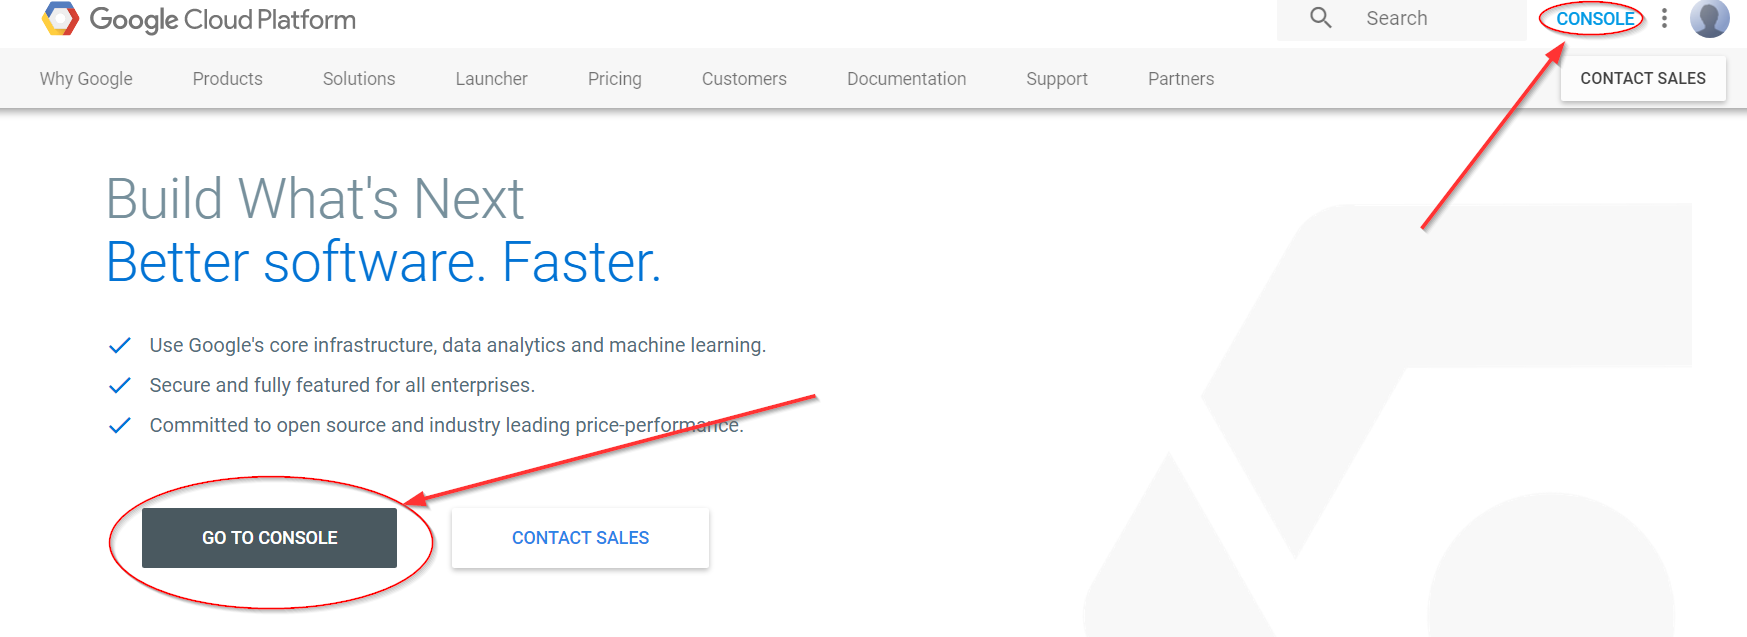 Then, navigate to the Compute Engine dashboard like so:
Step 3: Create a new VM instance
Simply click on Create in the VM Instances screen on your GCE dashboard, like so: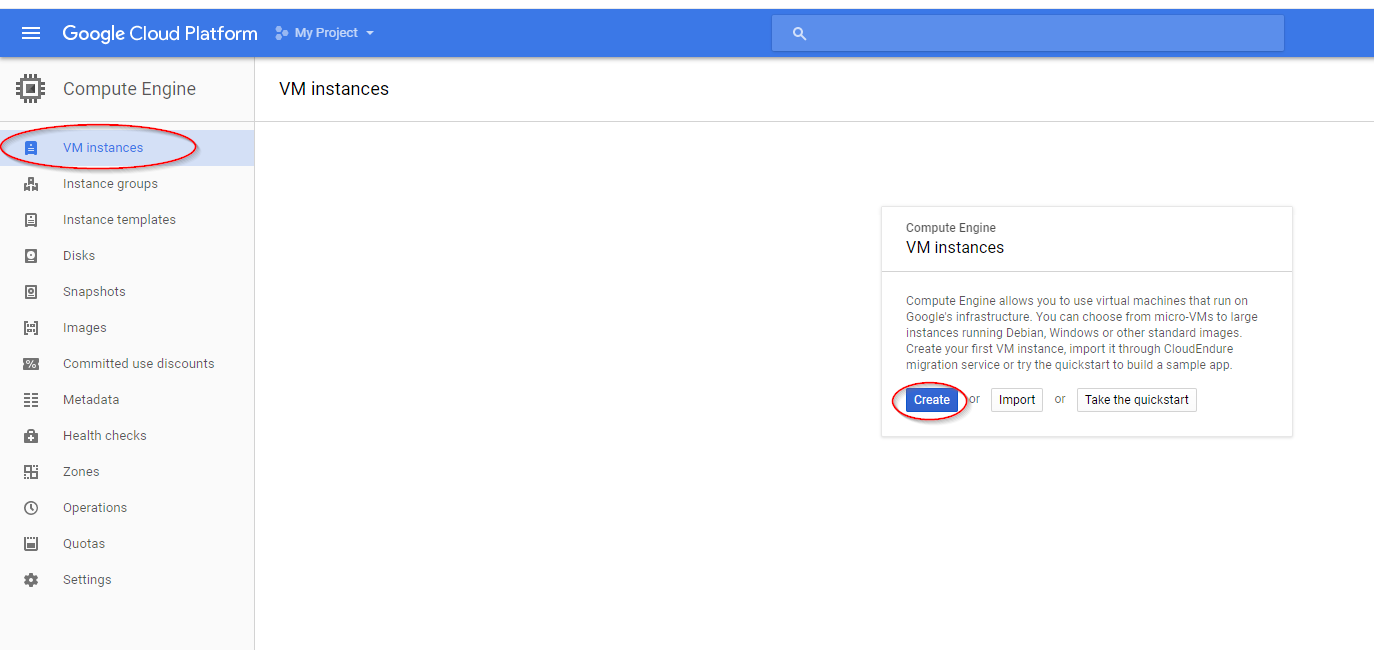 Then fill out the specs for your new instance. The specs I used look like this (you can see the cost estimate on the right):
 I used one of Google Cloud Platform’s US east-coast data centres since IB’s servers are located in the New York area. My algorithm isn’t latency-sensitive, but every little bit helps.
After clicking Create, the instance will take a few moments to spin up, then it will appear in your VM dashboard like so:
I used one of Google Cloud Platform’s US east-coast data centres since IB’s servers are located in the New York area. My algorithm isn’t latency-sensitive, but every little bit helps.
After clicking Create, the instance will take a few moments to spin up, then it will appear in your VM dashboard like so:

Step 4: Set up access control
Next, you need to set up a password for accessing the instance. Click the arrow next to RDP and select Set Windows password like so: Follow the prompts, and then copy the password and keep safe. Now you’re ready to connect to your instance!
Step 5: Connect and test
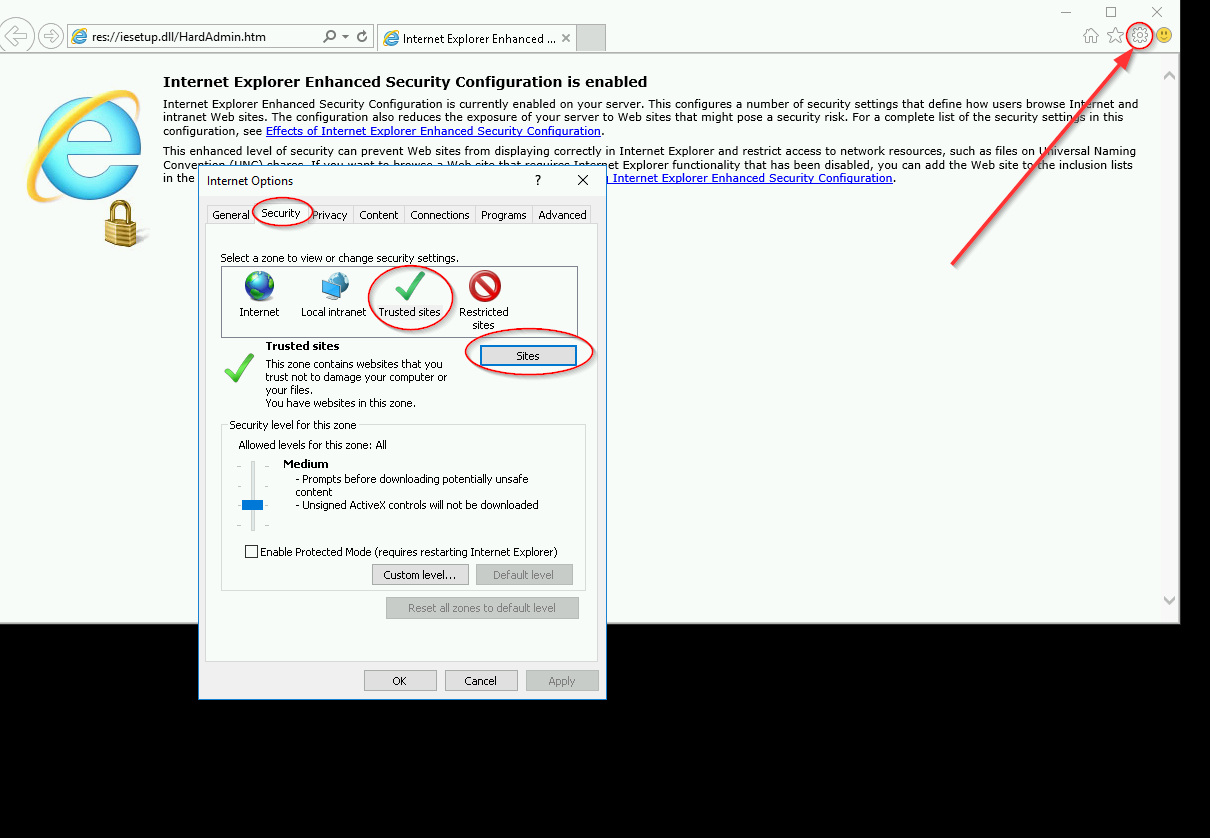
You can connect directly from the VM dashboard using Google’s remote desktop application for Chrome by clicking RDP (ensuring the correct VM is selected), or download the Windows RDP: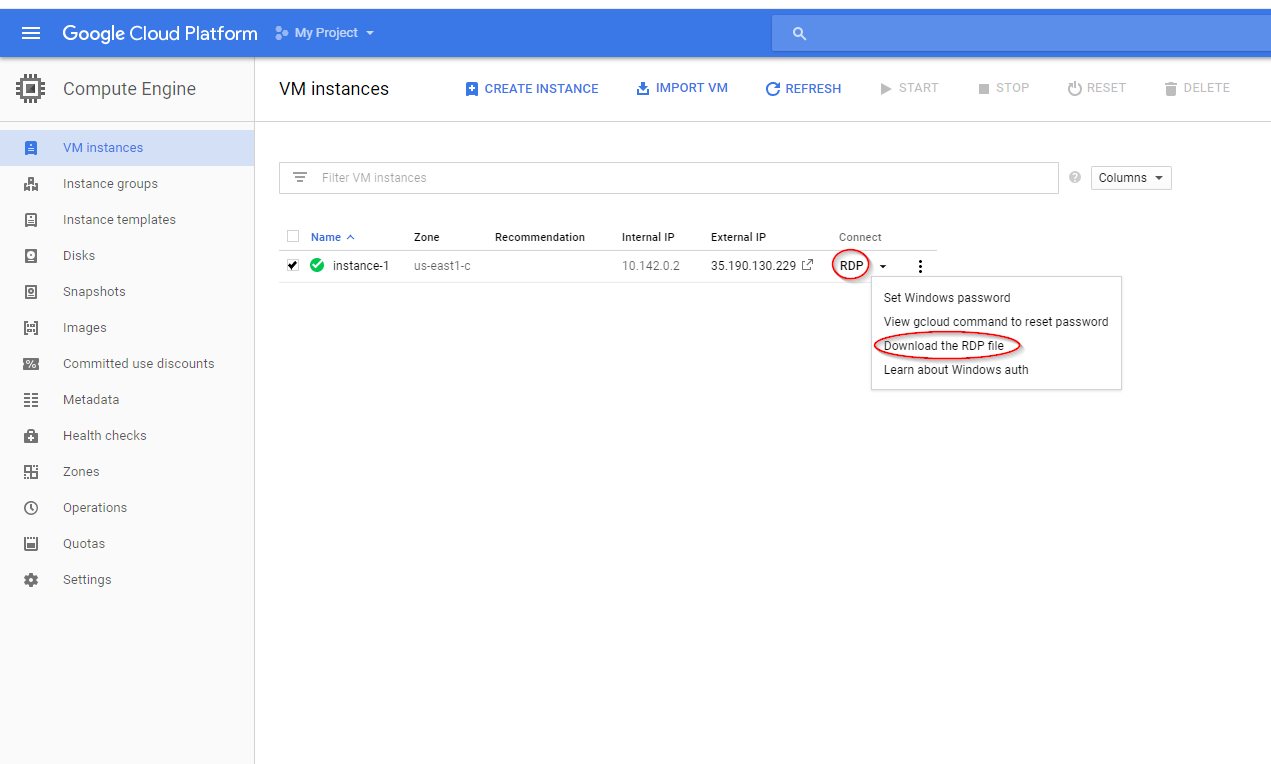 Once connected to the instance, it should look like a normal (although somewhat Spartan) Windows desktop. To test that it can connect to Interactive Brokers (IB), we are going to connect to IB’s test page. But first, we have to adjust some default internet settings. To do this, open Internet Explorer. Select the Settings cog in the top right of the browser then Internet Options, then Security, then Trusted Sites. Click the Sites button and add https://www.interactivebrokers.com to the list of trusted sites. Then save the changes. Here’s a visual from my instance:
 Now, connect to IB’s test page to check that your instance can communicate with IB’s servers. Simply navigate to https://www.interactivebrokers.com/cgi-bin/conn_test.pl in Internet Explorer. If the instance is connecting properly, you should see a page that looks like this:
 You can now upload your trading software and algorithm to your instance by simply copying and pasting from your home computer, or download any required software from the net. Note that to copy and paste from your home computer, you will need to access the instance using Windows RDP, not Chrome RDP (this may change with future updates to Chrome RDP).
Gotcha: changing permissions of root directory for Windows Server:
I found that I wasn’t able to install R packages from a script due to restrictions on accessing certain parts of the Windows file structure. To resolve this, I followed these steps:- In Windows Explorer, navigate to the R installation directory and right-click it, then choose Properties.
- Go to the Security tab.
- Click Advanced, then Change Permissions.
- Highlight your username, and click Edit.
- Choose This folder, subfolders and files under Applies to:
- Choose Full Control under Basic Permissions.
- Click OK.
Step 6: Don’t’ forget to stop the instance!
If you need to stop trading your algorithm, it is usually a good idea to stop the instance so that you aren’t charged for compute resources that you aren’t using. Do so from the VM dashboard: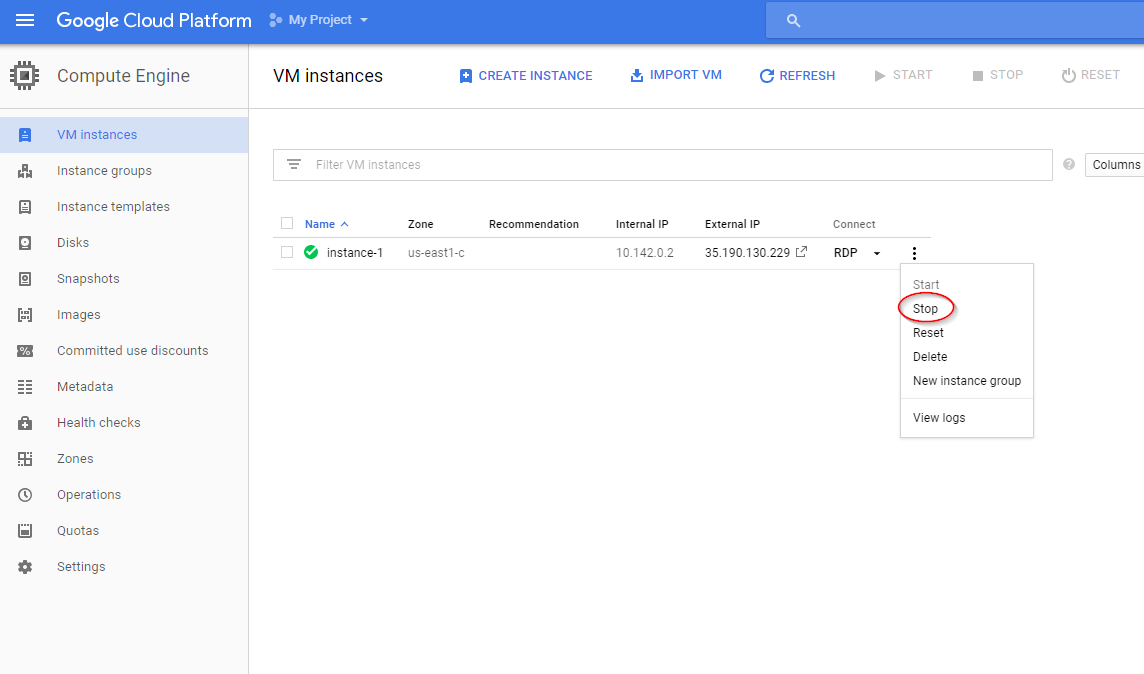 So long as you don’t delete the instance, you can always restart it from the same state at which it was stopped, meaning you don’t have to re-upload your software and scripts. You are not billed for an instance that has been stopped.
On the other hand, if you delete your instance and later want to restart, you will have to create a whole new instance and re-upload all your trading infrastructure. That’s where images come in handy: you can save an image of your setup, and then start an identical instance from the console. I’ll show you how to do that in another post.
So long as you don’t delete the instance, you can always restart it from the same state at which it was stopped, meaning you don’t have to re-upload your software and scripts. You are not billed for an instance that has been stopped.
On the other hand, if you delete your instance and later want to restart, you will have to create a whole new instance and re-upload all your trading infrastructure. That’s where images come in handy: you can save an image of your setup, and then start an identical instance from the console. I’ll show you how to do that in another post.
Concluding Remarks
Google Cloud Platform on the Command Line
In this post, I’ve demonstrated how to set up and run instances using the GCP Console. The same can be achieved using the Gcloud Command Line tool, which is worth learning to use if you start using GCP extensively thanks to the boost in productivity that comes with familiarity.Going Further
There’s a lot that can be done on GCP, including big data analytics and machine learning. We can also apply some simpler workflows to make our lives easier, such as creating custom images as mentioned above, or integrating with cloud storage infrastructure for managing historical data and using Data Studio for monitoring performance via attractive dashboard-style interfaces. I’m in a good position to show you the ropes on how to use these tools in your trading workflow, so if there is something in particular that you would like me to showcase, let me know in the comments. Happy Googling!Free Case Study:
A wantaway engineer’s journey into professional trading and out again
I went from engineering to an equity partnership at a prop trading firm to running my own systematic trading operation from home in Western Australia.
This case study is the full story – every mistake, every breakthrough, and some things I trade today.

Thank you for the article, really great 🙂
Adding to the cons: I used AWS for hosting my algos which adds a little bit of mitigation to latency as Amazon has more data centers around the world and you can try to find the one that is closer to your broker’s server.
Having said that, latency still will be an issue comparing to hosting a VPS right next to your broker’s server. But I agree with you, most retail guys aren’t HFT so +- 10-20 ms is not going to make a huge difference. I once hosted my algorithm in London only 6km from my broker’s server. The ping was marvelous yet the algo was losing… nothing beats a good strategy 🙂
Indeed! Thanks for telling us about your experience, Yury.
which was that 6km VPS you used Yury?
I tried out Amazon, Microsoft and Google’s VPS offerings a while back and found Amazon’s latency was noticeably less here on the east coast of Australia. I liked Google’s setup (and even MS) better than Amazon but in the end I stuck with Amazon as the local data centre made using the server via RDP almost as quick as a local machine.
Google are apparently going to have a local presence soon so maybe that will speed things up somewhat.
Thanks for sharing your experience! While latency associated with RDP or other access mechanisms is important for some applications, it is generally less so for trading algorithms. More important is the latency between the server and the execution venue. My experience is that I haven’t experienced an appreciable difference between Google and Amazon’s US east cost data centres (however I use neither of these options for anything that is particularly latency sensitive).
Very true Kris – I was using MT4 at the time in my testing so the latency was very important in terms of providing a fast enough screen redraw to provide a pleasant desktop-like experience. There was a VERY noticeable difference between the local points of presence and anything overseas.
But as you mentioned this is not necessarily a problem when you’re using trading algos.
I think it would be great to see a comparison between different VPS performance in a post somewhere.
From my experience google VPS support is quite poor compare to amazon.
A really important thing is that the VPS does not break, neither needs to reboot time to time and therefore I think amazon is better, since they have longer experienced providing VPS.
Besides you can get it cheaper than 55$ I think.
What about the use of ubuntu? did you try zorro on it? does it work ok?
Have you consider connecting two VPS? One small for trading, the other bigger for training which is only activated when training is needed. Then both vps share the Data folder of the trading one so that the new trained model is saved on the Zorro/Data folder of the cheap vps.
I haven’t done this myself, but nice idea, thanks for sharing. If I understood the concept, you’d need a separate storage repository for holding your data. But hey, storage is cheap!
Well storing the data in the live trading vps is not problem beside it is not much data but the train part becomes a problem since more cpu and ram resources are needed than just for live trading.
So then yeah one can train the strategy in a expensive vps and then copy manually the output files to the data folder in the live trading vps manually. Or one can just train the strategy in their home computer and then copy manully those files to the live trading vps but when it comes into outsourcing then sharing folders would the work.
Kris, I wonder if would be more powerful to write deep learning and machine learning algorithms directly using TensorFlow in google instead of R. I mean, TensorFlow probably is simpler and it scales, so it is possible to train neural nets or run algorithms in seconds instead of hours in R. Would you suggest to start studying R, or would you suggest to start directly using TensorFlow? Could you give some suggestion about this?
Thanks, I’m already enrolled in your course, very interesting 🙂
I wouldn’t say TensorFlow is simple! I also wouldn’t say that something that takes hours in R would take seconds in TensorFlow. Yes, it’s a library for mathematical computation and will be optimized as such, but still if you got that sort of speedup I’d say something was seriously wrong with the R code!
Whether you learn TensorFlow or R first really depends on what you want to do. I gather you’re interested in training neural networks for trading applications. For that, I’d start learning Keras, which is designed for rapid prototyping and experimentation with neural networks, and can be configured to use TensorFlow, Theano or CNTK as the backend computational library. Keras is implemented in Python and R. Trust me, it will make your life easier than diving straight into TensorFlow!
Glad to hear you’re enjoying the course!
Very impressive Kris! Thanks for taking the time to share your experience with us.
First, I would not recommend implementing this technique because the Platform does not offer a Windows Server as part of their promotion anymore. Simply put, a Windows Server would cost three times as much compared to what you mention. Second, reliability is questionable, simply because the VM could crash and the third party vendors that you mention do not offer any warranty so personally speaking I would not rely on any software vendor out of the API broker. In any case, I would suggest you show your followers how to reset (Ctrl+Alt+Del) the VM as well.
Hi Rod. Thanks for sharing your views.
I just jumped on GCP to take a look at what you mentioned about price. Seems I’m able to rent the same machine type with the same OS as in the post for the same price. Which is actually astounding given that nearly three years have passed since that post was released! I could be missing something of course – where do you get your 3x figure from?
I’m not sure I agree about reliability. Certainly, it would be preferable to use a Linux-based OS, but sometimes the ability to use a Windows-only tool trumps the convenience you’d get from a Linux box. However in my experience, the Windows machines that we’ve been using have been incredibly reliable. I’ve not had a single crash in several years of using them. Maybe I’ve just been lucky. Having said that, those annoying automatic updates can catch you out if you’re not careful…
Also, I don’t know any software vendors that would provide a warranty against a crashing VM. Is that actually a thing?
Finally I don’t think anyone needs a tutorial on using Ctrl-Alt-Del!
Zorro will run fine under Wine (www.winehq.com) in a Linux box if you want to save the $29 a month for the windows machine.